
If you run a WordPress site and want better rankings, faster load times and happier users, Core Web Vitals is where the real gains live. The good news is you don’t need to rebuild your website to see big improvements. With the right Cloudflare setup—plus a few smart WordPress tweaks—you can tighten up performance quickly and sustainably.

What are Core Web Vitals (and why do they matter)?
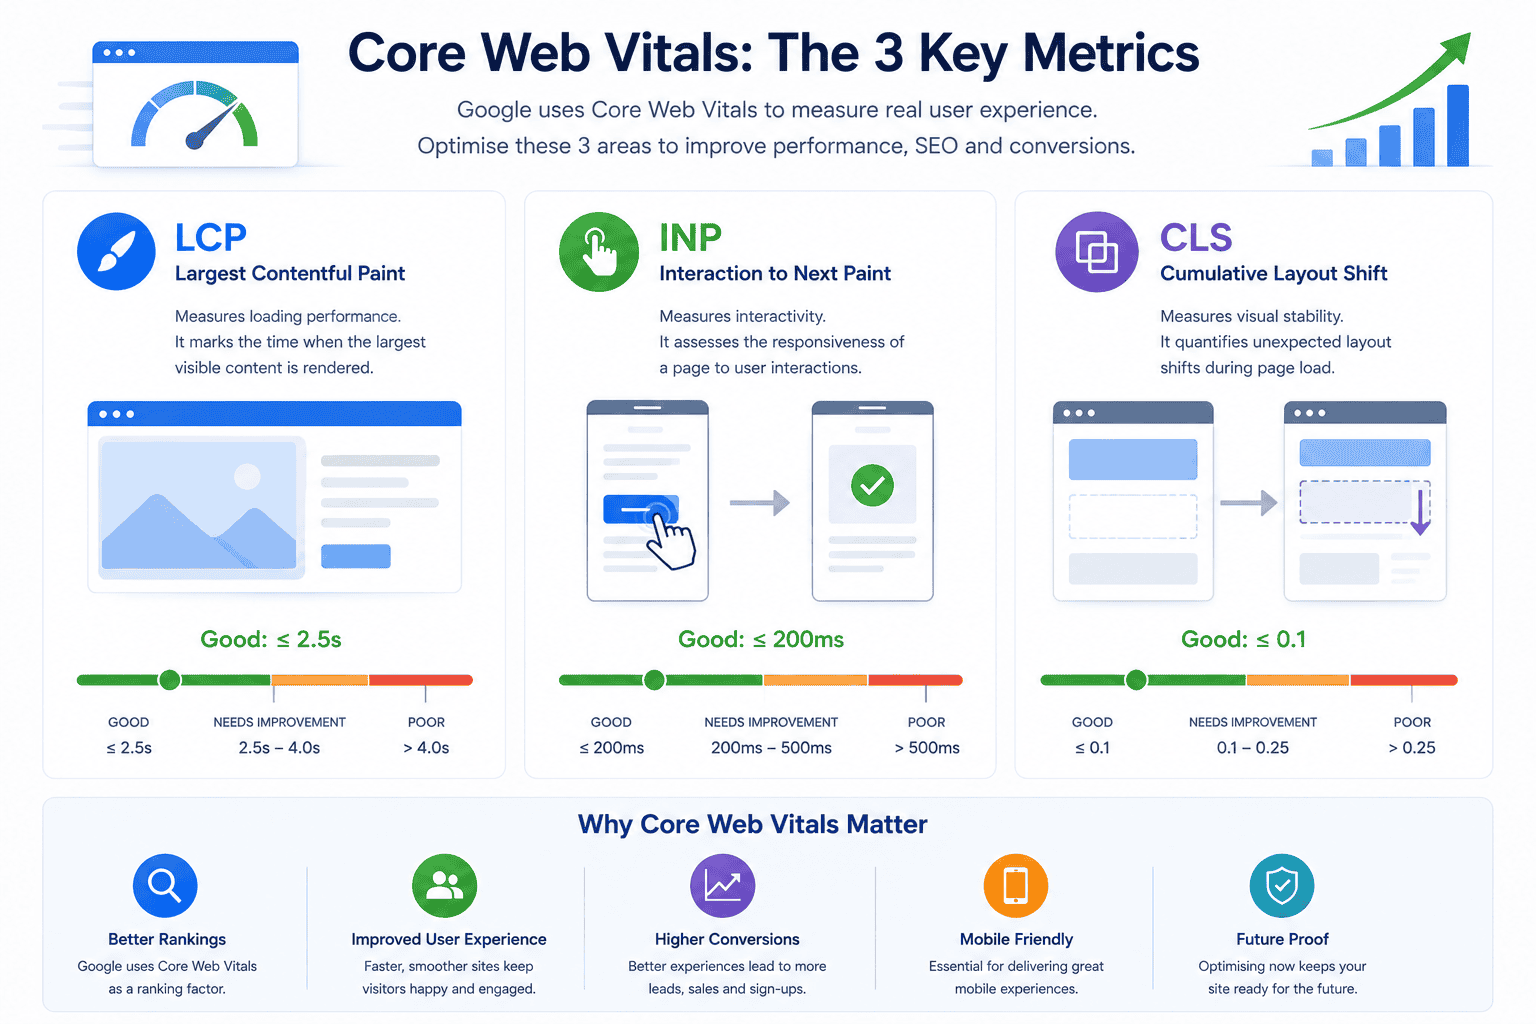
Core Web Vitals are Google’s way of measuring real-world user experience. They focus on three things:
• Largest Contentful Paint (LCP): how fast your main content (often the hero image or heading) appears. Aim ≤ 2.5 seconds.
• Interaction to Next Paint (INP): how quickly your page responds when people click or tap. Aim ≤ 200 ms.
• Cumulative Layout Shift (CLS): how stable your layout is while the page loads. Aim ≤ 0.1.
These metrics influence SEO, but they also impact revenue. Faster sites reduce bounce rate, increase conversion and make your brand feel more trustworthy—whether you’re a local business in Bradford or Leeds, or an e-commerce store selling nationwide.
Step 1
Get a baseline (so you know what to fix)
Before changing anything, run your key templates through:
• PageSpeed Insights: check mobile and desktop, and note the opportunities it highlights.
• Search Console’s Core Web Vitals report: look for sitewide patterns across URLs.
• A quick on-site audit: identify the LCP element on your homepage/product pages, spot any layout shifts (pop-ups, sticky bars), and list heavy third-party scripts.
Tip: take screenshots of your scores now. You’ll want before-and-after proof.
Step 2
Put your site behind Cloudflare
Move your DNS to Cloudflare (free plan is fine to start). Once active:
• SSL/TLS: set “Full (strict)” for security and performance.
• HTTP/2 and HTTP/3: ensure both are enabled.
• Brotli compression: on.
• Auto Minify: enable HTML, CSS, JS (test JS carefully if your theme is complex).
• Early Hints: on—this helps the browser start fetching critical files sooner, improving LCP.
Optional (test first): Rocket Loader can reduce render-blocking, but it may clash with certain themes or plugins. If anything breaks, switch it off.

Step 3
Add the official Cloudflare plugin to WordPress
Install and connect the Cloudflare plugin to your site. This gives you one-click cache purging and, crucially, access to Automatic Platform Optimisation (APO).
• Enable APO (add-on): APO caches your HTML at the edge for visitors who aren’t logged in, drastically cutting time to first byte and improving LCP. It also purges correctly when you update content. For most WordPress sites, APO is the single biggest performance boost you’ll get without touching code.
Step 4
Create caching rules that actually work for WordPress
Under Rules → Cache Rules (or Page Rules if you still see them):
• Cache anonymous HTML: “Cache Everything” for your public pages.
• Bypass admin and previews: exclude /wp-admin/, /wp-login.php, /wp-json/, ?preview=true, and WooCommerce checkout/ cart/ account pages.
• Respect cookies: bypass cache when WordPress login cookies are present so logged-in users see fresh content.
• Set Edge Cache TTL: start with 1 day for general pages, shorter for high-change content.
This setup keeps dynamic areas fresh while ensuring most visitors get pre-rendered pages directly from Cloudflare’s edge.
Step 5
Sort your images for LCP and CLS wins
Images are usually the biggest drag on Core Web Vitals—especially the hero image that often becomes the LCP element.
• Don’t lazy-load your LCP image: ensure the hero image and logo load immediately. Everything else can lazy-load.
• Serve modern formats: use WebP or AVIF. On Cloudflare Pro, “Polish” will auto-convert and compress; on the free plan, a plugin like ShortPixel or Imagify works well.
• Set width/height (or aspect-ratio) attributes on every image to avoid layout shift.
• Use responsive srcset/sizes so mobile devices aren’t downloading desktop-sized images.
Step 6
Stabilise your layout to fix CLS
Shifts that happen as ads, fonts or embeds load will tank your CLS score.
• Reserve space for banners, sticky headers, consent bars and embeds (YouTube, maps, etc).
• Use font-display: swap and self-host your fonts so text appears immediately without jumping.
• Avoid injecting dynamic elements above content that’s already visible. If you must, add them below or reserve space in CSS.
Step 7
Bring down INP with calmer JavaScript
Interaction to Next Paint punishes long tasks and chatty third-party scripts.
• Defer or delay non-critical scripts: analytics, heatmaps and chat widgets can load after first interaction.
• Use Cloudflare Zaraz (optional) to manage third-party tags server-side and reduce JavaScript bloat.
• Replace heavy sliders and animation libraries with lighter alternatives—or keep them below the fold.
• Audit plugins: disable what you don’t need, and replace outdated tools with performant equivalents.
Step 8
Deliver critical CSS and tidy render-blocking resources
• Critical CSS: inline the minimal CSS needed for above-the-fold content. Autoptimize or other optimisation plugins can help.
• Preload your hero image and primary web font: tell the browser what matters most.
• Combine where sensible: CSS combination can help, but don’t create a single mega-file that hurts caching.
• Keep HTML lean: trim unused page builder blocks, tidy the header and footer, and simplify your template hierarchy.
Step 9
Protect performance with good editorial habits
Technical changes get you most of the way, but content workflows keep you there.
• Upload optimised images only (export at the right dimensions).
• Keep titles concise, avoid heavy auto-embeds at the very top of the page, and place CTAs where they don’t shift layout.
• When adding new plugins, test PageSpeed Insights first on a staging site.
Step 10
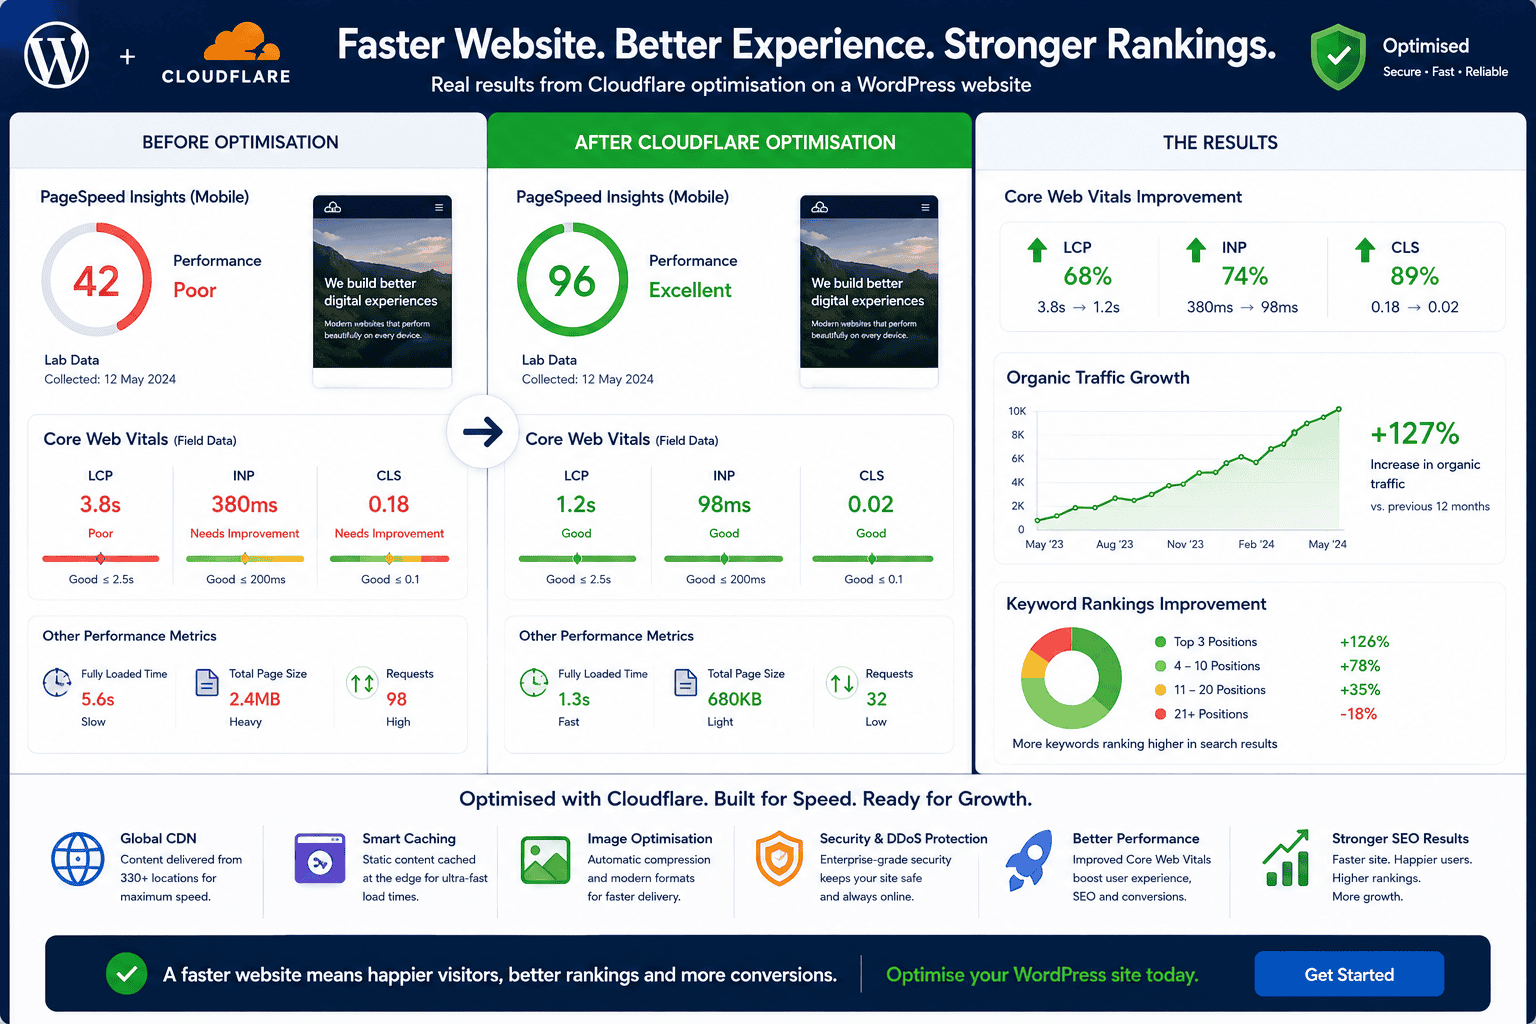
Measure, iterate, and celebrate the wins
Performance is not a one-off job. Schedule a monthly check:
• Search Console → Core Web Vitals: watch for improvements across URL groups.
• PageSpeed Insights: re-test key templates after any significant change.
• Cloudflare Analytics: keep an eye on cache hit ratio and bandwidth saved. If the hit ratio drops, review your cache rules.
Why choose a UK WordPress agency for this work?
We build and optimise WordPress sites for UK businesses every day, and we’re based in Bradford. Whether you’re a local service business or a growing e-commerce brand, we’ll configure Cloudflare, tune your WordPress stack and coach your team on image and content workflows so your gains stick.
Quick checklist you can action today
• Point DNS to Cloudflare and enable HTTPS, HTTP/3, Brotli and Early Hints.
• Install the Cloudflare WordPress plugin and enable APO.
• Create cache rules: cache public pages, bypass admin/checkout/preview, respect cookies.
• Optimise the hero image (no lazy-load), convert sitewide to WebP/AVIF, set explicit dimensions.
• Reserve space for all UI elements that might pop in later (CLS).
• Defer or delay third-party scripts; consider Cloudflare Zaraz.
• Inline critical CSS, preload your hero image and primary font.
• Re-test, tweak, repeat.
